Creating and Managing Tables
To create a table, connect to the database with psql or pgAdmin, and use SQL commands (opens in a new tab) to define tables, insert data, and create and manage users. To replicate, a table must have a primary key; UNLOGGED and TEMPORARY tables are not replicated.
Starting Replication
The Start Replication pane displays the tables that reside on your database. An icon to the left of each table identifies the state of the table.
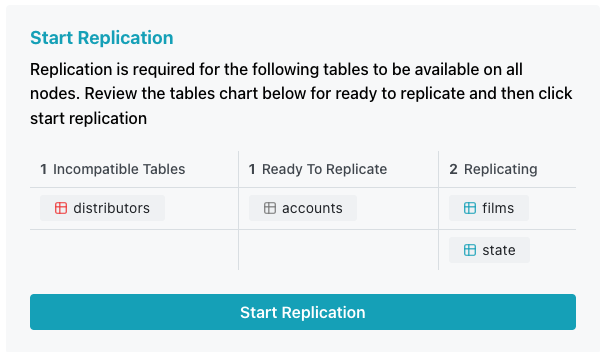
Table status can be:
readyfor replication - when a table is eligible for replication and ready, a table opens displaying the current state of all of the tables in the database.replicating- a blue table grid indicates a healthy replicating table.incompatible- The configuration of your table makes it ineligible for replication (opens in a new tab).
To start replication for the tables in the Ready to Replicate column, select the Start Replication button. When the replicated table is available, connection information for each node in the cluster is displayed in a tabbed pane below the Users information; select the tab for the node to which you wish to connect to copy information.
Using the Tables Viewer
When you add a table to your database, the table is added to the list of tables in the console window and the table state is noted. To display a list of tables sorted by schema and the table contents (where applicable), select the Tables node under the database name in the navigation pane.

When the table viewer opens:
- To collapse the list of tables that reside in a specific schema, use the control to the right of the schema name.
- Icons to the left of a table name indicate the status of a table; tables that are eligible for replication have a grey icon, a blue icon indicates that the table is replicating, and a red icon indicates that the table cannot be replicated. Use the key at the bottom of the table list for reference.
- Highlight a table name to display table data in the pane to the right.

Use the table controls at the bottom of the pane to specify your viewing preferences:
- Use the controls in the
Order byfield to select the row that will be used to sort the data displayed; select theASCicon to sort the rows in ascending order, or theDESCicon to sort in descending order. - Highlight a value in the
Limitfield to specify how many rows should be displayed at a time; choose from25,50, or100. - Use the arrows next to the
Rowsfield to page through the sorted results.